Turn on suggestions
Auto-suggest helps you quickly narrow down your search results by suggesting possible matches as you type.
Showing results for
- Republic of Gamers Forum
- Discussions
- Overclocking & Tweaking
- Did you or ANYONE resolve this issue of actual GPU...
Options
- Subscribe to RSS Feed
- Mark Topic as New
- Mark Topic as Read
- Float this Topic for Current User
- Bookmark
- Subscribe
- Mute
- Printer Friendly Page
6 AI Suite III Tips That Will Save Your Life!
Options
- Mark as New
- Bookmark
- Subscribe
- Mute
- Subscribe to RSS Feed
- Permalink
11-09-2013
06:22 AM
- last edited on
03-05-2024
06:19 PM
by
![]() ROGBot
ROGBot
AI Suite III is a very powerful piece of software to have on your ROG system. The plethora of utilities and options available allows you to fine tune every aspect of your system while monitoring all the variables in real time. Read on for some useful tips to help you get the best from AI Suite III.
Tip 1. Trouble installing AI Suite III?
Some of our users have been encountering some pesky issues when trying to install the application. If you’re one of the very few that could not get the installer to work for you, don’t fret. Continue reading!
Step 1. Navigate to the AXSP folder that’s in the AI Suite folder. Then right click axIns.exe and select Properties.
[/HR]

Step 2. Click the Unblock option at the bottom of the General tab.
[/HR]

Step 3. Proceed to the Compatibility tab and click the Change settings for all users option.
[/HR]

Step 4. Tick Run this program as an administrator option.
[/HR]

Step 5. Click Ok to apply your changes.
[/HR]

Step 6. Open HMService folder next. Then right click aaHMIns.exe and select Properties.
[/HR]

Step 7. Click the Unblock option at the bottom of the General tab.
[/HR]

Step 8. Proceed to the Compatibility tab and click the Change settings for all users option.
[/HR]

Step 9. Tick Run this program as an administrator option.
[/HR]

Step 10. Click Ok to apply your changes.
[/HR]

Step 11. Run AsusSetup.exe with administrator privileges.
[/HR]

Step 12. Open Task Manager and end the axIns.exe process to continue with the setup.
If above fix didn’t work for you, then you’ll need to dig up the DVD that came with your motherboard and follow these steps.
1. Pop the DVD into your optical drive.
2. Look for the AI Suite III folder on the DVD.
3. Run AsusSetup.exe with administrator privileges to install an earlier version of AI Suite III.
4. Follow the onscreen prompts.
5. When your installation is done, download the latest version from your motherboard’s support page.
6. Follow the instructions for a normal installation to update the older version.
Tip 2. Installing AI Suite III In Your Native Language.
AI Suite III comes in nine different languages. So if you’re not a native English speaker, then this tip will have you running AI Suite III in your favorite language in no time.
Step 1. Start by opening Registry Editor.
[/HR]

Step 2. Navigate to the following key: HKEY_LOCAL_MACHINE\SOFTWARE\Wow6432Node\ASUS\AI-SUITE_II Right click in the right window and create a new String Value.
[/HR]

Step 3. Name the String Value to Language.
[/HR]

Step 4. Input the value of your language.
[/HR]

Choose from below:
0404 = Traditional Chinese
0C04 = Traditional Chinese
1404 = Traditional Chinese
1004 = Simplified Chinese
0804 = Simplified Chinese
09 = English
0C = French
07 = German
0A = Spanish
11 = Japanese
12 = Korean
19 = Russian
Step 6. Restart your system and AI Suite III will be displayed in your language!
Tip 1. Trouble installing AI Suite III?
Some of our users have been encountering some pesky issues when trying to install the application. If you’re one of the very few that could not get the installer to work for you, don’t fret. Continue reading!
Step 1. Navigate to the AXSP folder that’s in the AI Suite folder. Then right click axIns.exe and select Properties.
[/HR]
Step 2. Click the Unblock option at the bottom of the General tab.
[/HR]
Step 3. Proceed to the Compatibility tab and click the Change settings for all users option.
[/HR]
Step 4. Tick Run this program as an administrator option.
[/HR]
Step 5. Click Ok to apply your changes.
[/HR]
Step 6. Open HMService folder next. Then right click aaHMIns.exe and select Properties.
[/HR]
Step 7. Click the Unblock option at the bottom of the General tab.
[/HR]
Step 8. Proceed to the Compatibility tab and click the Change settings for all users option.
[/HR]
Step 9. Tick Run this program as an administrator option.
[/HR]
Step 10. Click Ok to apply your changes.
[/HR]
Step 11. Run AsusSetup.exe with administrator privileges.
[/HR]
Step 12. Open Task Manager and end the axIns.exe process to continue with the setup.
If above fix didn’t work for you, then you’ll need to dig up the DVD that came with your motherboard and follow these steps.
1. Pop the DVD into your optical drive.
2. Look for the AI Suite III folder on the DVD.
3. Run AsusSetup.exe with administrator privileges to install an earlier version of AI Suite III.
4. Follow the onscreen prompts.
5. When your installation is done, download the latest version from your motherboard’s support page.
6. Follow the instructions for a normal installation to update the older version.
Tip 2. Installing AI Suite III In Your Native Language.
AI Suite III comes in nine different languages. So if you’re not a native English speaker, then this tip will have you running AI Suite III in your favorite language in no time.
Step 1. Start by opening Registry Editor.
[/HR]
Step 2. Navigate to the following key: HKEY_LOCAL_MACHINE\SOFTWARE\Wow6432Node\ASUS\AI-SUITE_II Right click in the right window and create a new String Value.
[/HR]
Step 3. Name the String Value to Language.
[/HR]
Step 4. Input the value of your language.
[/HR]
Choose from below:
0404 = Traditional Chinese
0C04 = Traditional Chinese
1404 = Traditional Chinese
1004 = Simplified Chinese
0804 = Simplified Chinese
09 = English
0C = French
07 = German
0A = Spanish
11 = Japanese
12 = Korean
19 = Russian
Step 6. Restart your system and AI Suite III will be displayed in your language!
Labels:
- Labels:
-
Overclocking
-
Tuning
-
Tweaking
378 Views
48 REPLIES 48
Options
- Mark as New
- Bookmark
- Subscribe
- Mute
- Subscribe to RSS Feed
- Permalink
11-10-2014 07:53 AM
Ok what i noticed was when i downloaded the AI Suite III from ASUS all the files were blocked the way i got around this was to put all the files into a Winrar folder and deleted the Original off of my desktop all i done then was extracted the files from Winrar into a new folder on my desktop this unlocked all the files and then run ASUSSETUP.EXE it worked a treat so if anyone is still having trouble try my method. you still may need to Open Task Manager and end the axIns.exe process to continue for some people. Hope this helped :cool:
Options
- Mark as New
- Bookmark
- Subscribe
- Mute
- Subscribe to RSS Feed
- Permalink
03-01-2015 11:29 PM
Nice guide thank you for the effort. Having issue the installation goes ok. After installation boot the computer. Click on AI Suite get an error message. Ivalid Class String, ProgID: Asus Fan Control Manager, Second warning, Invalid Class String, ProgID: Asus Fan Control Service.Fan Control Manager.
I have tried installation form the original CD. Same Issue. Uninstalled and reinstalled the OS two times same issue. This has been an issue since I purchased the R4 Black Edition. Any other recommendations for a fix would be appreciated. Thank You
I have tried installation form the original CD. Same Issue. Uninstalled and reinstalled the OS two times same issue. This has been an issue since I purchased the R4 Black Edition. Any other recommendations for a fix would be appreciated. Thank You
CaseLabs Magnum 8
Asus Rampage 4 Black Edition
I7 4930K 4.5GHz
Noctua NH D14
G-Skill Z Series 2133 MHz 16 Gb
2x GTX 780 S.C.
PSU Corsair AX 1500 I
2 x Samsung 850 Pro 2 Tbs Each
2 x Intel 730 Series 480 GBs Each
Sound On Board
Asus Rampage 4 Black Edition
I7 4930K 4.5GHz
Noctua NH D14
G-Skill Z Series 2133 MHz 16 Gb
2x GTX 780 S.C.
PSU Corsair AX 1500 I
2 x Samsung 850 Pro 2 Tbs Each
2 x Intel 730 Series 480 GBs Each
Sound On Board
Options
- Mark as New
- Bookmark
- Subscribe
- Mute
- Subscribe to RSS Feed
- Permalink
03-29-2015 07:26 PM
Good information thank you. Followed your guide. Installed each item one at a time with a boot between each installation. The issue Dual intelligent processor will not run. When Intelligent Dual Processor is installed AI Suite will not open. Rampage 4 Black Edition
I-7 4930K.
I-7 4930K.
CaseLabs Magnum 8
Asus Rampage 4 Black Edition
I7 4930K 4.5GHz
Noctua NH D14
G-Skill Z Series 2133 MHz 16 Gb
2x GTX 780 S.C.
PSU Corsair AX 1500 I
2 x Samsung 850 Pro 2 Tbs Each
2 x Intel 730 Series 480 GBs Each
Sound On Board
Asus Rampage 4 Black Edition
I7 4930K 4.5GHz
Noctua NH D14
G-Skill Z Series 2133 MHz 16 Gb
2x GTX 780 S.C.
PSU Corsair AX 1500 I
2 x Samsung 850 Pro 2 Tbs Each
2 x Intel 730 Series 480 GBs Each
Sound On Board
Options
- Mark as New
- Bookmark
- Subscribe
- Mute
- Subscribe to RSS Feed
- Permalink
08-12-2015 12:24 PM
Honestly just looking for a download link xD don't hate.
Options
- Mark as New
- Bookmark
- Subscribe
- Mute
- Subscribe to RSS Feed
- Permalink
08-15-2015 07:01 AM
Hello folks,
Long time have I've been absent from this forum until today when I'd apperciate some help with Fan Xpert 3 settings.
So the question is - Is there a way, for the fans that are controlled by some Temperature source, to be controlled by my VGA temperture.
So in basics, I'd like to add GPU temp as a source in the "Source" option. I've noticed that Fan Xpert 3 can "read" the Asus VGA temp, so now my only concern is - how to get that GPU temp onto the Source menu.
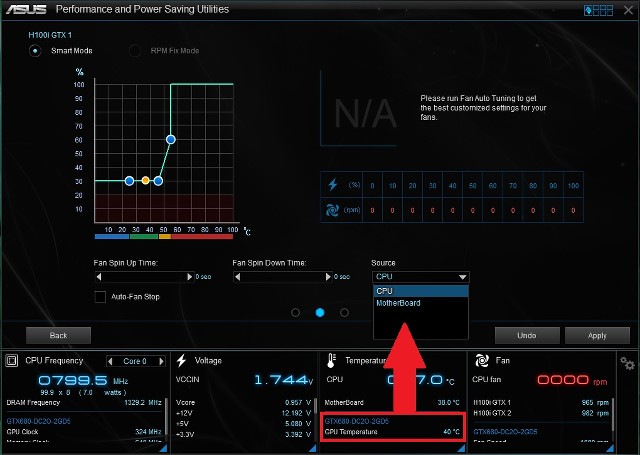
I'm trying to change this setting because my CPU/MBO temp is hovering around 40°C mark, but my VGA is about 50-60°C and there isn't enough fresh air sucked into the case from my H100i GTX fans. Some pics here and here.
Btw, I have an Asus Z97I-PLUS motherboard, Intel i3-4360 CPU, Asus GTX680 DC2O VGA, Corsair H100i GTX cooler, and the fans that I'm trying to control are 4-pin PWM type.
Thanks for your help and ideas in advance 🙂
Cheers
Long time have I've been absent from this forum until today when I'd apperciate some help with Fan Xpert 3 settings.
So the question is - Is there a way, for the fans that are controlled by some Temperature source, to be controlled by my VGA temperture.
So in basics, I'd like to add GPU temp as a source in the "Source" option. I've noticed that Fan Xpert 3 can "read" the Asus VGA temp, so now my only concern is - how to get that GPU temp onto the Source menu.
I'm trying to change this setting because my CPU/MBO temp is hovering around 40°C mark, but my VGA is about 50-60°C and there isn't enough fresh air sucked into the case from my H100i GTX fans. Some pics here and here.
Btw, I have an Asus Z97I-PLUS motherboard, Intel i3-4360 CPU, Asus GTX680 DC2O VGA, Corsair H100i GTX cooler, and the fans that I'm trying to control are 4-pin PWM type.
Thanks for your help and ideas in advance 🙂
Cheers
Options
- Mark as New
- Bookmark
- Subscribe
- Mute
- Subscribe to RSS Feed
- Permalink
11-13-2022 11:23 AM
ArrrOuuuG wrote:
Hello folks,
Long time have I've been absent from this forum until today when I'd apperciate some help with Fan Xpert 3 settings.
So the question is - Is there a way, for the fans that are controlled by some Temperature source, to be controlled by my VGA temperture.
So in basics, I'd like to add GPU temp as a source in the "Source" option. I've noticed that Fan Xpert 3 can "read" the Asus VGA temp, so now my only concern is - how to get that GPU temp onto the Source menu.
I'm trying to change this setting because my CPU/MBO temp is hovering around 40°C mark, but my VGA is about 50-60°C and there isn't enough fresh air sucked into the case from my H100i GTX fans. Some pics here and here.
Btw, I have an Asus Z97I-PLUS motherboard, Intel i3-4360 CPU, Asus GTX680 DC2O VGA, Corsair H100i GTX cooler, and the fans that I'm trying to control are 4-pin PWM type.
Thanks for your help and ideas in advance 🙂
Cheers
lol this issue is going to have grandkids. Can't any programmer at ASUS look into this basic bug?
or just release the source code I can do it myself lol!
Related Content
- Asus ROG Acting Up? Here's How to Solve Common Software Issues in Promotions & General Discussions
- Can I add a DeckLink 4K Extreme 12G Capture & Playback Card PCIe Card with my current in Hardware & Build Advice
- Strix 1080 Ti - Fan Connect II max ampere? in Promotions & General Discussions
- Help!!! Rog strix x570-e gaming no boot/post problem in Promotions & General Discussions
- Issue with AI Suite and RYUJIN AIO cooler in Promotions & General Discussions
