Turn on suggestions
Auto-suggest helps you quickly narrow down your search results by suggesting possible matches as you type.
Showing results for
- Republic of Gamers Forum
- Discussions
- Overclocking & Tweaking
- Problem with overclocking 10900k
Options
- Subscribe to RSS Feed
- Mark Topic as New
- Mark Topic as Read
- Float this Topic for Current User
- Bookmark
- Subscribe
- Mute
- Printer Friendly Page
Maximus 12 series and i9 10900k overclocking guide and tech sheet
Options
- Mark as New
- Bookmark
- Subscribe
- Mute
- Subscribe to RSS Feed
- Permalink
05-20-2020
08:03 AM
- last edited on
03-05-2024
07:25 PM
by
![]() ROGBot
ROGBot
Asus Z490 - Bios Done Right.
Here is an overclocking guide for the Z490 Maximus 12 series.
This was done on a 12 Extreme, but should apply throughout the series.
This is based on a 10900k.
Bios used: 0508.
A big thank you to the great Shamino at Asus for supplying the test system used for review.
----------------------------------------------
Easy mode for people who just want to play video games fast or get to work
Use all auto settings (all intel defaults-->load optimized defaults or after clear CMOS) to use system within Intel spec settings.
You can check your "SP" or chip quality rating in your BIOS.
Average chip is 63--most end users will get around this.
World record clocking LN2 SP chip is 117.
----------------------------------------------
Quick overclock:
Boot windows and run a simple load like Cinebench R20.
Then go back to BIOS and set core Ratio to AI Optimized.
Protip: the Exact settings AI Optimized sets or recommends to you can be found
in the "AI Features" page
(You can enable XMP as needed for your RAM).
Unfortunately I cannot help with memory overclocking, guys.
---------------------------------------------
Manual control the fast way:
Enable XMP, and just set your CPU multiplier. No need to change anything else.
The other auto settings should work well, 4.8 to 5.1 ghz without needing to tweak.
Gamers should get easy 5.0 ghz on all cores. No problem.
------------------------
Expectations:
Low end air cooler: 4.8 ghz
High end air cooler: 4.9 to 5 ghz
Good water AIO: 5 ghz-5.2 ghz, depending on chip quality
Custom loops, chilled water, delids: 5.2 ghz easy+, depending on quality
Extreme Torture stress tests: 4.8 ghz air, 5 ghz Water.
On all auto settings, your CPU will utilize thermal velocity boost component of turbo boost 3.0
allowing 4.9 ghz on all cores if CPU temp <=70C. Otherwise 4.8 ghz via Turbo boost 2.0. On light loads, the two best cores will run up to 5.3 ghz at <70C, otherwise 5.1 ghz for light loads.
---------------------------
Turbo Boost 3.0 behavior:
1) There are only two favored cores defaulted for x53 ratio. They can be viewed in
BIOS in CPU configuration or with newest CPUZ, under tools->clocks (in red).
2) Windows 10 ver 1909 or newer is required to prioritze favored cores.
3) You can only boost to x53 for light loads on TB 3.0 if:
a) no more than 2 cores are loaded.
b) the cores being used as the favored cores.
On all auto settings, Intel power limits and power limit time (TAU) will be respected. 250 watts "short term" CPU package power for Power limit 2, 125W long term PL for power limit 1.
------------------------
Taking manual control:
Setting all core multipliers manually will max your power limits and remove PL restrictions and multiplier restrictions from TVB.
Want to control your cpu voltage with fixed vcore without risk of overvoltage?
It's easy.
Bios will test your cooler. You can boot to windows a few times, run some regular programs then reboot and it will recalibrate the cooler.
Then just look at the prediction value. For most users, you want the "Non AVX" voltage. This is the voltage you set *IN THE BIOS*. And is calibrated for Level 4 Loadline Calibration. Set your manual vcore control closest to the predicted value, up to 5mv higher (example: if 1.172v predicted, set 1.175v, not 1.170v).
And that's all you need to do. You should be stable in 99% of applications, even normal stress tests, including realistic AVX stress tests (Realbench 2.56, Cinebench R20, Prime95 AVX disabled small FFT, AIDA64 Stress FPU). Prime95 small FFT with AVX or FMA3, Y-cruncher AVX2, LinX 0.9.6, Linpack Extreme are not important for 99% of users! Please ignore it for your own sanity. It really is not important. If you care about that anyway you can read advanced options below.
-----------------------------------------
Advanced stuff for those who like reading (or who enjoy Buildzoid's oscilloscope videos!)
-----------------------------------------
The Asus Bios is universally considered to be the milepost for how to design a UEFI Bios, and while this is my first Asus board since the legendary P5W series
Compared to Z390, Voltages are toned down. No more getting 1.35v IO/SA on XMP 3200 RAM. All auto settings (bios defaults) now use 100% spec Intel power limits and voltages, while some competitors seem to be back to breaking the rules to make their boards look better, which was happening all over with Z390.
The most important new feature Asus has included with Z490 is their voltage tuning.
I've tested this extensively on a 10900k sample at 4.8ghz-5 ghz on all cores, and Asus tuning for standard users is literally 100% accurate.
Asus has two main tunings: Non AVX and AVX. These are tuned for Loadline Calibration level 4 (L4). The calibrations work up to L6, but become more inaccurate at L6 and you should tune to your specific system. Higher levels of LLC have worse transient response, so it's impossible to get full accuracy at all LLC levels. I have used L4 up to 5.2 ghz prediction (only Cinebench R20 tested @ 5.2 all cores).
An example of what a high LLC does to your transient response can be seen on these Z390 scope captures using a 11 Gene:
https://elmorlabs.com/index.php/2019...ne-visualized/
As Buildzoid noted, it is the absolute minimum voltage that determines stability, not your average RMS. With the improvements to Z490 VRM, using a level 4 LLC keeps your Vmins very close to the voltage transient dips.
Non AVX is based on Prime95 29.8 build 6 small FFT with AVX disabled, and based on your cooling solution, sets a minimum voltage that is needed to maintain full stability. Normal users please focus on this.
At full load, this is called an absolute "vMin", or a minimum load voltage floor that is needed to process SSE2 instructions without errors. If full load die-sense vcore for any other app drops below this point seen in Prime95, based on the predicted point you set in BIOS, you may have stability issues.
Note that AVX instructions are an extension of SSE2 instructions, and this is why SSE2 stability is important. Yes, AVX instructions use more current and draw more heat, but contrary to what most people think, the "minimum" voltage floor is almost identical. What changes the floor is heat. Vdroop does not change the floor--it simply changes the starting (Bios set) voltage needed to compensate for it.
In my own tests (assuming your hyperthreading related "Auxiliary" voltages are set correctly--VCCIO and VCCSA), the Non-AVX Bios set prediction values will give the average user FULL stability in both non AVX programs and in realistic AVX Stress tests-including Realbench 2.56, Cinebench R20, AIDA64 "Stress FPU", and Battlefield 5.
I've found that Prime95 small FFT with AVX disabled, Realbench 2.56, CB R20 and AIDA64 "Stress FPU" are all very close to the same current load and require about the same voltages overall.
The "Die sense" full load vcore reported vmin (based on prime95 small FFT AVX disabled) is the target point. If your AVX workloads remain at or above this Vmin, you should be stable. What you do not want is for your AVX workload to drop below this Vmin at full load.
The AVX bios voltage requirement is based on Prime95 small FFT with AVX. I found these not as accurate on L4 as the AVX disabled predictions, because the die-sense load voltage for AVX enabled may drop lower than the Vmin point of prime95 small FFT with AVX disabled at the prediction points. That can cause instability, so if that happens on your chip, increase bios voltage a bit until the load voltage is better than the prime AVX disabled load voltage. You can use HWinfo64's WHEA sensors log to check for CPU Cache L0 errors.
Also please keep in mind that the heat output of AVX enabled is going to also be MUCH higher than AVX disabled, which will also require an even higher Vmin. Example: If your chip is stable at load 1.05v @ 4.7 ghz in AVX disabled small FFT Prime95, it's NOT going to be just as stable at the same 1.05v load 4.7 ghz AVX enabled prime95, because your temps will be about 10-15C higher. You need to compensate for that.
Gamers and content creators should pay attention to the Non AVX predictions. They are that good.
Now I'm going to say this directly: PRIME95 AVX SMALL FFT STABILITY IS NOT IMPORTANT ON THIS PLATFORM! The AVX disabled prediction is good enough for regular AVX use!
Unless you are doing medical or scientific /number crunching work that requires these instructions, don't worry about AVX small FFT. Seriously. Passing Prime95 AVX small FFT, FMA3 small FFT, LinX 0.9.6 35000 sample size, Linpack Extreme 1.1.2, and putting 250 amps into your CPU is cool and all and it feels good if you pass it, but seriously it's NOT important! Heat output on 10 cores and the higher vdroop and current draw in these worst-case torture tests are NOT based on realistic usage situations, so there's NO need for anyone to say "If it's not AVX small FFT stable it's not stable." This applies even more when you exceed 4.8 ghz on all cores.
Another thing: Stop complaining about VRM temps! Cooler temps are always nice to have, but VRM's are designed to run hot and can operate to their rated temps. A VRM isn't a CPU. A VRM isn't suddenly going to throw math calculations or make your +12v drop to 10v at 85C. 60-70C is fine. This is fine. You can always use the fan to cool them more. Capacitors care about temps at 85C max. A VRM can run at 100C without causing crashes. So there's no need to say board X is worse than Y because X VRM's reached 75C while Y's reached 55C so Y is better--not true. That will not affect performance.
-------------------
Personal test results: Here are some of my own results from testing to demonstrate the accuracy of "Non AVX Prediction" at LLC4:
Vmins: Fixed Vcore test: 4.7 ghz: low vcore:
1.150v bios set, LLC4-->stable Apex Legends, Minecraft loading, AIDA64 "Stress FPU" (1.039v load! AIDA FPU), Prime95 AVX disabled small FFT stable
VMIN: 1.145v bios set, 1.012v load, Realbench 2.56 4 hours stable, 62C max, AIDA64: 1.012v load. 1 hour 64C max. Prime95 small FFT AVX disabled stable (1.012v load). 1000 khz VRM switching frequency seems to help Minecraft loading screen vmin very slightly. (Minecraft is a special case as it puts a 100% load on all cores when loading. It also seems to expose a 'bug' in the skylake core causing an Internal Parity Error randomly at a Vmin higher than expected. This bug was found during Apex Legends testing and debugging by Respawn's programmer Oriostorm, This causes a "Parity Error" rather than the more expected "L0 cache error" from too low vcore.
4.8ghz, 1.215v L4 LLC, AIDA64 stress FPU stable (1.066v load AIDA64 FPU stable), Minecraft loading stable, Prime 95 AVX enabled stable.
Bios set test: 1.180v LLC4: AIDA64 Stress FPU: 68C, 1.048v load
Realbench 2.56, 66C, 1.048v load, Minecraft Java: random Internal Parity Errors loading
Minecraft Java VMIN: 1.190v L4, 1.066v load, 60C max, 22 loads, No Internal Parity Errors over 22 consecutive main menu loads.
Absolute Vmin bios prediction: 1.175v, VRM 1000 khz-->seems to help minecraft.
4.9ghz, 1.225v L4 LLC, AIDA64, minecraft java load (1.083v load AIDA64 FPU, 145 amps, 72C, 1 hour test (Arctic Freezer II 360, ambient 74F)
5 ghz/4.7 cache @ 1000 khz
LLC4 test: 1.285v LLC4-Vmin SSE2, Normal AVX, Minecraft load loops, Prime95 SSE2, etc: 1.128v load. Minecraft Java loading screen test 40 loops @ LLC6, 500 khz (100% CPU, CPU Internal Parity Error test):
Higher LLC test: 1.235v bios set LLC6, VCCIO: 1.05v, VCCSA 1.10v. Load voltage vmin: 1.153v
----------------------
Hyperthreading seems to be very dependent on IO/System agent voltages, and very erratic stabilty can happen when you are very close to the voltage Vmin. To check if L3 cache/IMC (Via VCCIO/VCCSA, which are signal rails, both related to the memory controller) is hurting stability, use Prime95 AVX disabled in-place fixed FFT 112k-112k and look for HWinfo64 WHEA CPU Cache L0 errors within 10mv of your Vmin or for random programs crashing during the 112k test. 112K in-place fixed FFT is a strange case. It actually hits the system RAM and caches hard, so it can determine if your IMC auxiliaries are set properly.
When testing at your vmin, if your VCCIO/VCCSA is too low, you may get the following:
1) WHEA CPU Cache L0 error in HWinfo64 sensors.
2) System Service Exception (or IRQL) BSOD
3) Random crashed prime95 threads.
4) Your Video driver settings crashing randomly during the stress test (Radeonsettings has stopped working).
There seems to be about a 10mv-20mv range where a too high IO/SA (or too low) will cause random issues during a 112K-112K in place AVX disabled Prime95 stress test, or during Realbench 2.56 / AIDA64 Stress FPU, unless you increase CPU Vcore enough.
If your IO and SA are set properly, if your Vmin is too low, AIDA64 "Stress FPU" should report "instability detected" instead of you getting a BSOD or your video card driver crashing
I found that 1.05v VCCIO and 1.10v VCCSA seems to be the best point for me. Your mileage will vary and it depends on your RAM timings and memory speeds!
If you are unstable, you can also just increase CPU Voltage. Also note that higher XMP speeds also will require a higher IO/SA. This is the reason why people have found that they need a higher CPU Vcore when overclocking their RAM. Sometimes a higher IO/SA at 4000 mhz RAM speeds will let you reduce vcore slightly.
Some random AVX power virus tests (seriously don't focus on small FFT AVX).
Prime95 AVX1 15K: 1.250v LLC6, VCCIO: 1.05v, VCCSA: 1.10v (load voltage min: 1.128v).
Prime95 AVX2 (FMA3) 15K: 1.270v LLC6, VCCIO: 1.05v, VCCSA: 1.10v (load voltage min: 1.137v)
5.1 ghz: Prime95 AVX1: 1.320v LLC6--100C (FMA3 is impossible--temps).
5.2 ghz: Cinebench, gaming: 1.380v LLC4 (prediction)--1.199v load--passed CB R20. I did not do much testing at all here. 1.350v LLC6 also passed.
5.3 ghz test: : Minecraft loading, Battlefield 5 fully stable @ 1.380v LLC7, Stress testing is impossible (temps--100% in seconds then hard lock, e.g. Cinebench R20).
Battlefield 5 reached the 80's.
I used a high LLC here because of lack of prediction points at 5.3 ghz (too few samples) and vdroop would be much too high, so I wanted a lower BIOS voltage at the cost of bad transients.
---------------
An issue with offset voltage/adaptive when using a high AC Loadline, and why ACLL/DCLL 0.01 mOhms is very good.
Random tech rambling.
5.3 ghz+ Offset voltage +5mv + SVID Behavior: Typical (AC/DC Loadline=0.6 mOhms)+ Loadline Calibration: Intel default (1.1 mOhms = LLC3): seemed to be VERY unreliable and unpredictable depending on test: Idle voltage was 1.420v, however Random Internal parity errors loading Minecraft. However Vcore response was VERY smooth and evenly controlled when doing any full core load like Cinebench R20 (1.320v load) with no oscillations. But loading minecraft or Battlefield 5 caused erratic voltage swings from 1.305v(!) to 1.480v(!), which made vmin randomly too low. This is the same issue I encountered on Z390 when trying to use AC Loadline to control load voltages at a high overclock. It seems that ACLL can boost the output voltage reliably using this formula:
Vcore=vCPU + (ACLL * IOUT) - (LLC * IOUT) + vOffset
However with mixed AVX/non AVX loads that are NOT on all cores loaded, it seems like ACLL doesn't raise the output voltage at the correct time, which causes too much vdroop, and at other times raises it during a low load situation, causing too much vcore. This is not a bios bug, but rather an issue with mixed loads with high transients and AC Loadline responding to it, as I encountered on the Z390 Aorus Master when trying to use Offset mode (Auto mode=offset + 0mv) with AC Loadline 1.6 mOhms, LLC: Standard (1.6 mOhms=Intel spec) at 5.2 ghz. Example: 1.32v during Cinebench R20 (nice and even VR VOUT), but Battlefield 5 ranging from 1.28v (= BSOD!) to 1.46v
The only way to avoid an issue like this is to set ACLL to 0.01 mOhms to limit how much it can boost the output voltage, but then you need to use a higher Loadline calibration. (remember: on offset mode, the HIGHER you set the AC Loadline value, the LOWER Level you must set for Loadline calibration (low levels of LLC=higher mOhms of resistance, so you should try to keep ACLL close to LLC (VRM Loadline).
But if you're going to use offset mode with ACLL 0.01 mOhms, you're better off using fixed vcore or adaptive voltage anyway. The only advantage of offset mode with ACLL=0.01 mOhms, compared to fixed vcore (let's say you are using LLC: L6 in both) is the ability to downvolt while idle to avoid high idle voltages, but there is one other advantage: offset mode with ACLL 0.01 mOhms allows you to take advantage of Thermal Velocity Boost to raise the vCPU as temps increase, but if you need to use a higher Loadline calibration, you get a transient response penalty compared to a steeper LLC.
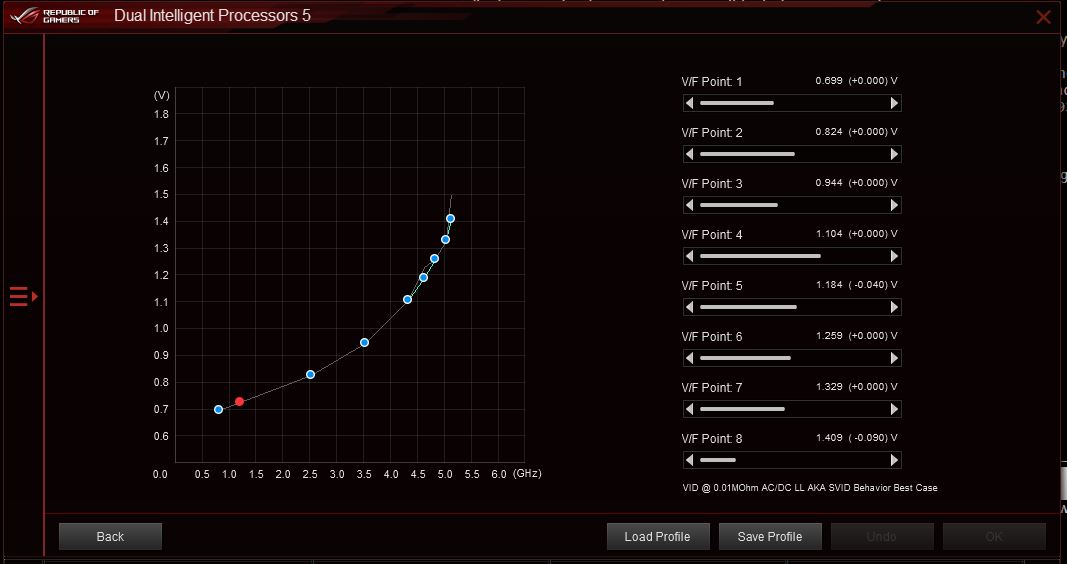
As a gamer, and you hear this often, it's commonly recommended to disable all c-states and power saving to maximize stability. Having a constant clock and steady voltage states with c-states disabled is often recommended by many experienced people, including Mr Fox on notebookreview forums and LN2'ers and so on.
Having the new VF curve feature can help with low load instability issues when using c-states in offset or adaptive modes. Using a fixed offset applies the offset to all voltage points at each frequency step. You can use the VF Curve to tune this.
(end of part 1)
Here is an overclocking guide for the Z490 Maximus 12 series.
This was done on a 12 Extreme, but should apply throughout the series.
This is based on a 10900k.
Bios used: 0508.
A big thank you to the great Shamino at Asus for supplying the test system used for review.
----------------------------------------------
Easy mode for people who just want to play video games fast or get to work
Use all auto settings (all intel defaults-->load optimized defaults or after clear CMOS) to use system within Intel spec settings.
You can check your "SP" or chip quality rating in your BIOS.
Average chip is 63--most end users will get around this.
World record clocking LN2 SP chip is 117.
----------------------------------------------
Quick overclock:
Boot windows and run a simple load like Cinebench R20.
Then go back to BIOS and set core Ratio to AI Optimized.
Protip: the Exact settings AI Optimized sets or recommends to you can be found
in the "AI Features" page
(You can enable XMP as needed for your RAM).
Unfortunately I cannot help with memory overclocking, guys.
---------------------------------------------
Manual control the fast way:
Enable XMP, and just set your CPU multiplier. No need to change anything else.
The other auto settings should work well, 4.8 to 5.1 ghz without needing to tweak.
Gamers should get easy 5.0 ghz on all cores. No problem.
------------------------
Expectations:
Low end air cooler: 4.8 ghz
High end air cooler: 4.9 to 5 ghz
Good water AIO: 5 ghz-5.2 ghz, depending on chip quality
Custom loops, chilled water, delids: 5.2 ghz easy+, depending on quality
Extreme Torture stress tests: 4.8 ghz air, 5 ghz Water.
On all auto settings, your CPU will utilize thermal velocity boost component of turbo boost 3.0
allowing 4.9 ghz on all cores if CPU temp <=70C. Otherwise 4.8 ghz via Turbo boost 2.0. On light loads, the two best cores will run up to 5.3 ghz at <70C, otherwise 5.1 ghz for light loads.
---------------------------
Turbo Boost 3.0 behavior:
1) There are only two favored cores defaulted for x53 ratio. They can be viewed in
BIOS in CPU configuration or with newest CPUZ, under tools->clocks (in red).
2) Windows 10 ver 1909 or newer is required to prioritze favored cores.
3) You can only boost to x53 for light loads on TB 3.0 if:
a) no more than 2 cores are loaded.
b) the cores being used as the favored cores.
On all auto settings, Intel power limits and power limit time (TAU) will be respected. 250 watts "short term" CPU package power for Power limit 2, 125W long term PL for power limit 1.
------------------------
Taking manual control:
Setting all core multipliers manually will max your power limits and remove PL restrictions and multiplier restrictions from TVB.
Want to control your cpu voltage with fixed vcore without risk of overvoltage?
It's easy.
Bios will test your cooler. You can boot to windows a few times, run some regular programs then reboot and it will recalibrate the cooler.
Then just look at the prediction value. For most users, you want the "Non AVX" voltage. This is the voltage you set *IN THE BIOS*. And is calibrated for Level 4 Loadline Calibration. Set your manual vcore control closest to the predicted value, up to 5mv higher (example: if 1.172v predicted, set 1.175v, not 1.170v).
And that's all you need to do. You should be stable in 99% of applications, even normal stress tests, including realistic AVX stress tests (Realbench 2.56, Cinebench R20, Prime95 AVX disabled small FFT, AIDA64 Stress FPU). Prime95 small FFT with AVX or FMA3, Y-cruncher AVX2, LinX 0.9.6, Linpack Extreme are not important for 99% of users! Please ignore it for your own sanity. It really is not important. If you care about that anyway you can read advanced options below.
-----------------------------------------
Advanced stuff for those who like reading (or who enjoy Buildzoid's oscilloscope videos!)
-----------------------------------------
The Asus Bios is universally considered to be the milepost for how to design a UEFI Bios, and while this is my first Asus board since the legendary P5W series
Compared to Z390, Voltages are toned down. No more getting 1.35v IO/SA on XMP 3200 RAM. All auto settings (bios defaults) now use 100% spec Intel power limits and voltages, while some competitors seem to be back to breaking the rules to make their boards look better, which was happening all over with Z390.
The most important new feature Asus has included with Z490 is their voltage tuning.
I've tested this extensively on a 10900k sample at 4.8ghz-5 ghz on all cores, and Asus tuning for standard users is literally 100% accurate.
Asus has two main tunings: Non AVX and AVX. These are tuned for Loadline Calibration level 4 (L4). The calibrations work up to L6, but become more inaccurate at L6 and you should tune to your specific system. Higher levels of LLC have worse transient response, so it's impossible to get full accuracy at all LLC levels. I have used L4 up to 5.2 ghz prediction (only Cinebench R20 tested @ 5.2 all cores).
An example of what a high LLC does to your transient response can be seen on these Z390 scope captures using a 11 Gene:
https://elmorlabs.com/index.php/2019...ne-visualized/
As Buildzoid noted, it is the absolute minimum voltage that determines stability, not your average RMS. With the improvements to Z490 VRM, using a level 4 LLC keeps your Vmins very close to the voltage transient dips.
Non AVX is based on Prime95 29.8 build 6 small FFT with AVX disabled, and based on your cooling solution, sets a minimum voltage that is needed to maintain full stability. Normal users please focus on this.
At full load, this is called an absolute "vMin", or a minimum load voltage floor that is needed to process SSE2 instructions without errors. If full load die-sense vcore for any other app drops below this point seen in Prime95, based on the predicted point you set in BIOS, you may have stability issues.
Note that AVX instructions are an extension of SSE2 instructions, and this is why SSE2 stability is important. Yes, AVX instructions use more current and draw more heat, but contrary to what most people think, the "minimum" voltage floor is almost identical. What changes the floor is heat. Vdroop does not change the floor--it simply changes the starting (Bios set) voltage needed to compensate for it.
In my own tests (assuming your hyperthreading related "Auxiliary" voltages are set correctly--VCCIO and VCCSA), the Non-AVX Bios set prediction values will give the average user FULL stability in both non AVX programs and in realistic AVX Stress tests-including Realbench 2.56, Cinebench R20, AIDA64 "Stress FPU", and Battlefield 5.
I've found that Prime95 small FFT with AVX disabled, Realbench 2.56, CB R20 and AIDA64 "Stress FPU" are all very close to the same current load and require about the same voltages overall.
The "Die sense" full load vcore reported vmin (based on prime95 small FFT AVX disabled) is the target point. If your AVX workloads remain at or above this Vmin, you should be stable. What you do not want is for your AVX workload to drop below this Vmin at full load.
The AVX bios voltage requirement is based on Prime95 small FFT with AVX. I found these not as accurate on L4 as the AVX disabled predictions, because the die-sense load voltage for AVX enabled may drop lower than the Vmin point of prime95 small FFT with AVX disabled at the prediction points. That can cause instability, so if that happens on your chip, increase bios voltage a bit until the load voltage is better than the prime AVX disabled load voltage. You can use HWinfo64's WHEA sensors log to check for CPU Cache L0 errors.
Also please keep in mind that the heat output of AVX enabled is going to also be MUCH higher than AVX disabled, which will also require an even higher Vmin. Example: If your chip is stable at load 1.05v @ 4.7 ghz in AVX disabled small FFT Prime95, it's NOT going to be just as stable at the same 1.05v load 4.7 ghz AVX enabled prime95, because your temps will be about 10-15C higher. You need to compensate for that.
Gamers and content creators should pay attention to the Non AVX predictions. They are that good.
Now I'm going to say this directly: PRIME95 AVX SMALL FFT STABILITY IS NOT IMPORTANT ON THIS PLATFORM! The AVX disabled prediction is good enough for regular AVX use!
Unless you are doing medical or scientific /number crunching work that requires these instructions, don't worry about AVX small FFT. Seriously. Passing Prime95 AVX small FFT, FMA3 small FFT, LinX 0.9.6 35000 sample size, Linpack Extreme 1.1.2, and putting 250 amps into your CPU is cool and all and it feels good if you pass it, but seriously it's NOT important! Heat output on 10 cores and the higher vdroop and current draw in these worst-case torture tests are NOT based on realistic usage situations, so there's NO need for anyone to say "If it's not AVX small FFT stable it's not stable." This applies even more when you exceed 4.8 ghz on all cores.
Another thing: Stop complaining about VRM temps! Cooler temps are always nice to have, but VRM's are designed to run hot and can operate to their rated temps. A VRM isn't a CPU. A VRM isn't suddenly going to throw math calculations or make your +12v drop to 10v at 85C. 60-70C is fine. This is fine. You can always use the fan to cool them more. Capacitors care about temps at 85C max. A VRM can run at 100C without causing crashes. So there's no need to say board X is worse than Y because X VRM's reached 75C while Y's reached 55C so Y is better--not true. That will not affect performance.
-------------------
Personal test results: Here are some of my own results from testing to demonstrate the accuracy of "Non AVX Prediction" at LLC4:
Vmins: Fixed Vcore test: 4.7 ghz: low vcore:
1.150v bios set, LLC4-->stable Apex Legends, Minecraft loading, AIDA64 "Stress FPU" (1.039v load! AIDA FPU), Prime95 AVX disabled small FFT stable
VMIN: 1.145v bios set, 1.012v load, Realbench 2.56 4 hours stable, 62C max, AIDA64: 1.012v load. 1 hour 64C max. Prime95 small FFT AVX disabled stable (1.012v load). 1000 khz VRM switching frequency seems to help Minecraft loading screen vmin very slightly. (Minecraft is a special case as it puts a 100% load on all cores when loading. It also seems to expose a 'bug' in the skylake core causing an Internal Parity Error randomly at a Vmin higher than expected. This bug was found during Apex Legends testing and debugging by Respawn's programmer Oriostorm, This causes a "Parity Error" rather than the more expected "L0 cache error" from too low vcore.
4.8ghz, 1.215v L4 LLC, AIDA64 stress FPU stable (1.066v load AIDA64 FPU stable), Minecraft loading stable, Prime 95 AVX enabled stable.
Bios set test: 1.180v LLC4: AIDA64 Stress FPU: 68C, 1.048v load
Realbench 2.56, 66C, 1.048v load, Minecraft Java: random Internal Parity Errors loading
Minecraft Java VMIN: 1.190v L4, 1.066v load, 60C max, 22 loads, No Internal Parity Errors over 22 consecutive main menu loads.
Absolute Vmin bios prediction: 1.175v, VRM 1000 khz-->seems to help minecraft.
4.9ghz, 1.225v L4 LLC, AIDA64, minecraft java load (1.083v load AIDA64 FPU, 145 amps, 72C, 1 hour test (Arctic Freezer II 360, ambient 74F)
5 ghz/4.7 cache @ 1000 khz
LLC4 test: 1.285v LLC4-Vmin SSE2, Normal AVX, Minecraft load loops, Prime95 SSE2, etc: 1.128v load. Minecraft Java loading screen test 40 loops @ LLC6, 500 khz (100% CPU, CPU Internal Parity Error test):
Higher LLC test: 1.235v bios set LLC6, VCCIO: 1.05v, VCCSA 1.10v. Load voltage vmin: 1.153v
----------------------
Hyperthreading seems to be very dependent on IO/System agent voltages, and very erratic stabilty can happen when you are very close to the voltage Vmin. To check if L3 cache/IMC (Via VCCIO/VCCSA, which are signal rails, both related to the memory controller) is hurting stability, use Prime95 AVX disabled in-place fixed FFT 112k-112k and look for HWinfo64 WHEA CPU Cache L0 errors within 10mv of your Vmin or for random programs crashing during the 112k test. 112K in-place fixed FFT is a strange case. It actually hits the system RAM and caches hard, so it can determine if your IMC auxiliaries are set properly.
When testing at your vmin, if your VCCIO/VCCSA is too low, you may get the following:
1) WHEA CPU Cache L0 error in HWinfo64 sensors.
2) System Service Exception (or IRQL) BSOD
3) Random crashed prime95 threads.
4) Your Video driver settings crashing randomly during the stress test (Radeonsettings has stopped working).
There seems to be about a 10mv-20mv range where a too high IO/SA (or too low) will cause random issues during a 112K-112K in place AVX disabled Prime95 stress test, or during Realbench 2.56 / AIDA64 Stress FPU, unless you increase CPU Vcore enough.
If your IO and SA are set properly, if your Vmin is too low, AIDA64 "Stress FPU" should report "instability detected" instead of you getting a BSOD or your video card driver crashing
I found that 1.05v VCCIO and 1.10v VCCSA seems to be the best point for me. Your mileage will vary and it depends on your RAM timings and memory speeds!
If you are unstable, you can also just increase CPU Voltage. Also note that higher XMP speeds also will require a higher IO/SA. This is the reason why people have found that they need a higher CPU Vcore when overclocking their RAM. Sometimes a higher IO/SA at 4000 mhz RAM speeds will let you reduce vcore slightly.
Some random AVX power virus tests (seriously don't focus on small FFT AVX).
Prime95 AVX1 15K: 1.250v LLC6, VCCIO: 1.05v, VCCSA: 1.10v (load voltage min: 1.128v).
Prime95 AVX2 (FMA3) 15K: 1.270v LLC6, VCCIO: 1.05v, VCCSA: 1.10v (load voltage min: 1.137v)
5.1 ghz: Prime95 AVX1: 1.320v LLC6--100C (FMA3 is impossible--temps).
5.2 ghz: Cinebench, gaming: 1.380v LLC4 (prediction)--1.199v load--passed CB R20. I did not do much testing at all here. 1.350v LLC6 also passed.
5.3 ghz test: : Minecraft loading, Battlefield 5 fully stable @ 1.380v LLC7, Stress testing is impossible (temps--100% in seconds then hard lock, e.g. Cinebench R20).
Battlefield 5 reached the 80's.
I used a high LLC here because of lack of prediction points at 5.3 ghz (too few samples) and vdroop would be much too high, so I wanted a lower BIOS voltage at the cost of bad transients.
---------------
An issue with offset voltage/adaptive when using a high AC Loadline, and why ACLL/DCLL 0.01 mOhms is very good.
Random tech rambling.
5.3 ghz+ Offset voltage +5mv + SVID Behavior: Typical (AC/DC Loadline=0.6 mOhms)+ Loadline Calibration: Intel default (1.1 mOhms = LLC3): seemed to be VERY unreliable and unpredictable depending on test: Idle voltage was 1.420v, however Random Internal parity errors loading Minecraft. However Vcore response was VERY smooth and evenly controlled when doing any full core load like Cinebench R20 (1.320v load) with no oscillations. But loading minecraft or Battlefield 5 caused erratic voltage swings from 1.305v(!) to 1.480v(!), which made vmin randomly too low. This is the same issue I encountered on Z390 when trying to use AC Loadline to control load voltages at a high overclock. It seems that ACLL can boost the output voltage reliably using this formula:
Vcore=vCPU + (ACLL * IOUT) - (LLC * IOUT) + vOffset
However with mixed AVX/non AVX loads that are NOT on all cores loaded, it seems like ACLL doesn't raise the output voltage at the correct time, which causes too much vdroop, and at other times raises it during a low load situation, causing too much vcore. This is not a bios bug, but rather an issue with mixed loads with high transients and AC Loadline responding to it, as I encountered on the Z390 Aorus Master when trying to use Offset mode (Auto mode=offset + 0mv) with AC Loadline 1.6 mOhms, LLC: Standard (1.6 mOhms=Intel spec) at 5.2 ghz. Example: 1.32v during Cinebench R20 (nice and even VR VOUT), but Battlefield 5 ranging from 1.28v (= BSOD!) to 1.46v
The only way to avoid an issue like this is to set ACLL to 0.01 mOhms to limit how much it can boost the output voltage, but then you need to use a higher Loadline calibration. (remember: on offset mode, the HIGHER you set the AC Loadline value, the LOWER Level you must set for Loadline calibration (low levels of LLC=higher mOhms of resistance, so you should try to keep ACLL close to LLC (VRM Loadline).
But if you're going to use offset mode with ACLL 0.01 mOhms, you're better off using fixed vcore or adaptive voltage anyway. The only advantage of offset mode with ACLL=0.01 mOhms, compared to fixed vcore (let's say you are using LLC: L6 in both) is the ability to downvolt while idle to avoid high idle voltages, but there is one other advantage: offset mode with ACLL 0.01 mOhms allows you to take advantage of Thermal Velocity Boost to raise the vCPU as temps increase, but if you need to use a higher Loadline calibration, you get a transient response penalty compared to a steeper LLC.
As a gamer, and you hear this often, it's commonly recommended to disable all c-states and power saving to maximize stability. Having a constant clock and steady voltage states with c-states disabled is often recommended by many experienced people, including Mr Fox on notebookreview forums and LN2'ers and so on.
Having the new VF curve feature can help with low load instability issues when using c-states in offset or adaptive modes. Using a fixed offset applies the offset to all voltage points at each frequency step. You can use the VF Curve to tune this.
(end of part 1)
Labels:
- Labels:
-
Overclocking
-
Tuning
-
Tweaking
412 Views
26 REPLIES 26
Options
- Mark as New
- Bookmark
- Subscribe
- Mute
- Subscribe to RSS Feed
- Permalink
08-25-2020 12:03 PM
The V-F curve is useful for more than just fixing idle issues. The default v-f for my 10700k had 5.1 GHz point way too high and the 4.6 GHz point was anomalous, Below are the default (top) and my corrected (bottom) v-f curves. I verified the lower 4.6 GHz point was stable. This curve is stable at LLC5.
If I have some time, I may go through and optimize each point to its lowest value. I have only verified 5.0, 5.1 are lowest.
This is a very nice and useful feature Shamino, thanks!
@Shamino
There is one oddity with v-f . When I try to OC 5.2 GHz, point 8 is for 5.2 GHz and there is a gap then between 5.0 and 5.2 GHz. In order to get 5.2 stable, the interpolated voltage for 5.1 is higher than necessary, I would have thought that the point 8 would still be for 5.1, with 5.2 being taken care of by the adaptive "additional turbo voltage" which kicks in at 5,2. Is this a bug?
ROG Hero XIII | 10900k @5.2 GHz | g.skill 2x32GB 4200 CL18 | ROG Strix 2070S | EK Nucleus 360 Dark | 6TB SSD/nvme, 16TB external HDD | 2x 1440p | Vanatoo speakers with Klipsch sub | Fractal Meshify 2 case
Options
- Mark as New
- Bookmark
- Subscribe
- Mute
- Subscribe to RSS Feed
- Permalink
08-26-2020 10:38 AM
@Shamino
To add to the above. On my 10700k, when I select a multiplier of 52 in the BIOS. point 8 gets applied to the 52 multiplier (which is above turbo threshold) instead of 51. In the AISuite vf editor, it appears as applied to 51, when in fact it is 52. I think the BIOS VF point 8 should always be applied to the maximum turbo multiplier (in this case 51), since above maximum turbo the additional core voltage can be controlled by other means.
ROG Hero XIII | 10900k @5.2 GHz | g.skill 2x32GB 4200 CL18 | ROG Strix 2070S | EK Nucleus 360 Dark | 6TB SSD/nvme, 16TB external HDD | 2x 1440p | Vanatoo speakers with Klipsch sub | Fractal Meshify 2 case
Options
- Mark as New
- Bookmark
- Subscribe
- Mute
- Subscribe to RSS Feed
- Permalink
09-09-2020 08:58 AM
I got 10700k 2 days ago and now testing... My SP is only 51 and using Noctua cooler.
My prediction for x45 AVX is 1.355v it is too big value for only 45 😞 So, I start testing cpu with
svid disable, and manual voltage without HT.Difernce with or wihout HT is about 0.030 by prediction.
Now I.m on 1.150 in bios and 1.134v in windows...in prime AVX2 after 10min testing, temps are 70C and
voltage drop to 1.083v.
So I will continue with drop manual voltage by 0.010 until prime errors. My question is, is it posible
that prediction is wrong??? I tested couple cpus and pridiction was 99,9% acurate, but in this case it
is something new for me, bcs diference between prediction and test are 0.2v. I will continue with 4.5Ghz
and after that try 46,47 ....My limit is Noctua and I cant go max than 1.25v to be safe.
Options
- Mark as New
- Bookmark
- Subscribe
- Mute
- Subscribe to RSS Feed
- Permalink
09-13-2020 04:30 AM
Jane Doe wrote:
I got 10700k 2 days ago and now testing... My SP is only 51 and using Noctua cooler.
My prediction for x45 AVX is 1.355v it is too big value for only 45 😞 So, I start testing cpu with
svid disable, and manual voltage without HT.Difernce with or wihout HT is about 0.030 by prediction.
Now I.m on 1.150 in bios and 1.134v in windows...in prime AVX2 after 10min testing, temps are 70C and
voltage drop to 1.083v.
So I will continue with drop manual voltage by 0.010 until prime errors. My question is, is it posible
that prediction is wrong??? I tested couple cpus and pridiction was 99,9% acurate, but in this case it
is something new for me, bcs diference between prediction and test are 0.2v. I will continue with 4.5Ghz
and after that try 46,47 ....My limit is Noctua and I cant go max than 1.25v to be safe.
I don't think the prediction is entirely accurate. But it is very close. My prediction varies by temperature sometime but generally it floats between 1.339v and 1.334v for 5.0GHz@LLC4.
I set via AC/DC Load Line to 0.4 mOhms to generate a bios set of 1.314v (as displayed in the top right panel). This is stable for me after a 1-hour prime 95 small fft (no avx/avx2) test. It is also stable after 1-hour CB R20 loop test.
Try to find the setting under the advanced tab --> CPU Config --> CPU - power management and find the boot performance mode. Set it to turbo so that you can see voltage at your highest frequency within bios if it is not already set this way.
Now set AC/DC Load Line to 0.01 save & reboot into bios and this should display what your Vmin is for the CPU VID. This is the lowest VID for that particular frequency. Once you know the floor you can maybe judge what next to do.
0.01 mOhm should be the lowest VID value for your target frequency with increasing values of AC/DC load line providing higher VID values.
I am using this technique based upon Shamino's suggestion of trimming the AC/DC Load Line to get the VID that you want. A higher AC/DC Load Line of 0.4mOhm or 0.5mOhm is what worked for me.
Asus's own SVID behavior suggests that 0.6mOhm is the "typical" behavior of the VID. So most people should fall into that range. I don't know if this is helpful information but I thought to add as it could be an indicator of your voltage performance relative to others or Asus's data.
edit: I also have an i7 10700K
Options
- Mark as New
- Bookmark
- Subscribe
- Mute
- Subscribe to RSS Feed
- Permalink
10-01-2020 05:19 PM
Great stuff your guide helped coming from an overclocked 8700k to a 10850k Thankyou. What was your SP as a reference?
I would have loved to see some more settings that should be either enabled or disabled in the bios just to confirm what I did was right.
More in-depth stuff about your 5.1/5.2 passes would also be greatly appreciated.
Another observation I've had was when running LLC4,5,6,7 the vdroop was definitely lower at LLC7 than 4 which allowed me to run a lower vcore overall. With such a large gap why was it recommended to use LLC4? Are we really that worried about overshoot?
With a SP79 10850k @5.1ghz LLC7 on 1.31v in bios translating to 1.314v in windows can't recall my vmin exactly but its approx 1.28v, will reconfirm after I run a few more stability tests. Honestly, I haven't found an unstable point yet so I'm trying to dial down the vcore a bit more to yield lower temps and power consumption during desk/non-gaming workloads.
Been noticing lately that my 5.1 oc keeps dropping on desktop idle to my avx offset and for the life of me I cannot work out what is causing these avx instructions. Ive tried to close down all unnecessary apps and what not but still no luck so I've kind of resulted in not having an avx offset.
When I attempted prime 95 small FFT with AVX it hit past 95 degs (with -1 or 2 offset) and triggered thermal throttling. So I stopped the test and this is even though I have a full custom loop running dual EKWB PE 360 rad blocks.
Options
- Mark as New
- Bookmark
- Subscribe
- Mute
- Subscribe to RSS Feed
- Permalink
10-02-2020 02:28 PM
morph. wrote:
Great stuff your guide helped coming from an overclocked 8700k to a 10850k Thankyou. What was your SP as a reference?
I would have loved to see some more settings that should be either enabled or disabled in the bios just to confirm what I did was right.
More in-depth stuff about your 5.1/5.2 passes would also be greatly appreciated.
Another observation I've had was when running LLC4,5,6,7 the vdroop was definitely lower at LLC7 than 4 which allowed me to run a lower vcore overall. With such a large gap why was it recommended to use LLC4? Are we really that worried about overshoot?
With a SP79 10850k @5.1ghz LLC7 on 1.31v in bios translating to 1.314v in windows can't recall my vmin exactly but its approx 1.28v, will reconfirm after I run a few more stability tests. Honestly, I haven't found an unstable point yet so I'm trying to dial down the vcore a bit more to yield lower temps and power consumption during desk/non-gaming workloads.
Been noticing lately that my 5.1 oc keeps dropping on desktop idle to my avx offset and for the life of me I cannot work out what is causing these avx instructions. Ive tried to close down all unnecessary apps and what not but still no luck so I've kind of resulted in not having an avx offset.
When I attempted prime 95 small FFT with AVX it hit past 95 degs (with -1 or 2 offset) and triggered thermal throttling. So I stopped the test and this is even though I have a full custom loop running dual EKWB PE 360 rad blocks.
The guide should only be used as a beginning estimate, and the VF points prediction is not perfect. In fact, two chips with the same SP score can overclock far differently, there are SP 63's that clock as well as SP 90's, and SP 8x's that are worse than some SP63's!
Two chips with the same SP score can have different voltage grace margins, also known as guardbands, and there is no way for any Bios to test for something like this by any sort of VID or programming. The only way to test for this is to actually run a stress test, and I think only one board in existence allows stress testing in the Bios, and that's a Z490 dark (IIRC).
Another huge thing that can influence how well a chip will overclock is the scaling. Particularly, the V/F scaling between 5.1 and 5.2 ghz. The smaller this is, the better. If your chip has a low SP score but the scaling between 5.1 and 5.2 ghz is still very strong (e.g. 50mv or lower difference on V/F points--the smaller the VF difference, the better the scaling), then that chip may respond to voltage or overclock much better than a chip that has terrible scaling (like 150mv difference between 5.1 to 5.2 ghz). Such a high V/F delta usually means that that chip is "past" its voltage wall. I don't have multiple chips to test nor do I have access to this information; there are those much more fortunate who have many chips to bin, and I am not one of them.
My ES chip is SP94, but seems to respond like an SP 8x chip (almost identically to I think criskoe's SP84 chip on overclock.net). VF is 1.305v at 5.1 ghz and 1.393v at 5.2 ghz, which is an average delta. I've seen some of the best chips have a 30-40mv delta and the absolute worst I think was either 170mv or 180mv (something like 1.329v to 1.499v).
Options
- Mark as New
- Bookmark
- Subscribe
- Mute
- Subscribe to RSS Feed
- Permalink
02-02-2021 08:03 AM
My System:
10900k + Maximus XII Hero Wifi + 16GB Corsair Venegance RGB
My Problem is, that i get Q-Code(0F or 6F) with a black screen when i set the Cache Ratio to 48.
But lower than 48 i get BSOD right after booting in to windows. Also my the asus Prediction from my maximus XII Hero is strange...
I only can run he system with Cache Ration set to auto.
Further my system seems really unstable like not fluently e nough. When i start up my Pc it takes so long till i am in windows.
My Changes:
XMP I
Sync all cores to 51
CPU voltage 1.330V
Memory Voltage 1.45V
LLC Level 7 and Current Capability to 140%
I hope someone is familiar with this problem.
10900k + Maximus XII Hero Wifi + 16GB Corsair Venegance RGB
My Problem is, that i get Q-Code(0F or 6F) with a black screen when i set the Cache Ratio to 48.
But lower than 48 i get BSOD right after booting in to windows. Also my the asus Prediction from my maximus XII Hero is strange...
I only can run he system with Cache Ration set to auto.
Further my system seems really unstable like not fluently e
nough. When i start up my Pc it takes so long till i am in windows.My Changes:
XMP I
Sync all cores to 51
CPU voltage 1.330V
Memory Voltage 1.45V
LLC Level 7 and Current Capability to 140%
I hope someone is familiar with this problem.
- « Previous
- Next »
Related Content
- Asus ROG Acting Up? Here's How to Solve Common Software Issues in Promotions & General Discussions
- ROG STRIX Z590-A GAMING WIFI ai optimized does not work in Overclocking & Tweaking
- ROG Maximus z790 Hero BIOS Tweaking with Corsair 4x16 Vengence RAM DDR5 @6600 in Overclocking & Tweaking
- How to remove Armoury Crate in Hardware & Build Advice
- ROG Strix B650e-e wi fi help in Hardware & Build Advice
